iAHRS IMU
iAHRS IMU를 ROS 2에 연결하고 /imu/data 토픽으로 발행되는 자세 데이터를 RViz에서 확인합니다.
참고 자료
이 실습은 MechaSolution iAHRS ROS 2 Driver를 사용합니다.
준비물
- Ubuntu 24.04와 ROS 2 Jazzy가 설치된 PC
- iAHRS IMU
- USB 케이블
드라이버와 시각화 도구 설치
드라이버를 워크스페이스의 src 폴더에 복제한 뒤 의존성을 설치하고 빌드합니다. IMU 자세를 RViz에서 표시하기 위해 imu-tools도 함께 설치합니다.
$ sudo apt update
$ sudo apt install -y ros-jazzy-imu-tools

$ cd ~/ros2_ws/src
~/ros2_ws/src$ git clone https://github.com/mechasolution/iahrs_ros2_driver.git

$ cd ~/ros2_ws
~/ros2_ws$ rosdep install --from-paths src --ignore-src -r -y
~/ros2_ws$ colcon build --symlink-install
~/ros2_ws$ source install/setup.bash
시리얼 포트 권한 설정
iAHRS를 연결한 뒤 시리얼 장치 이름을 확인합니다.
$ ls /dev/ttyUSB*
현재 사용자를 dialout 그룹에 추가합니다.
$ sudo usermod -aG dialout $USER
경고
그룹 권한은 로그아웃 후 다시 로그인해야 적용됩니다. 다시 로그인한 뒤 groups 명령어 결과에 dialout이 있는지 확인하세요.
장치 경로 설정
iahrs_ros2_driver/param/config.yaml을 열고 port를 앞에서 확인한 장치 이름으로 설정합니다.
iahrs_ros2_driver/iahrs_ros2_driver/param/config.yaml
/**:
  ros__parameters:
    port: "/dev/ttyUSB0"
    frame_id: "imu_link"
    parent_frame_id: "base_link"
    publish_tf: true
수정한 설정이 설치 공간에 반영되도록 다시 빌드합니다.
$ cd ~/ros2_ws
~/ros2_ws$ colcon build --symlink-install --packages-select iahrs_ros2_driver iahrs_ros2_driver_msgs
~/ros2_ws$ source install/setup.bash
IMU 실행
$ ros2 launch iahrs_ros2_driver iahrs_driver.launch.py
새 터미널에서 /imu/data 토픽을 확인합니다.
$ source ~/ros2_ws/install/setup.bash
$ ros2 topic list
$ ros2 topic echo /imu/data --once
드라이버는 다음 센서 토픽을 발행합니다.
/imu/data: 자세, 각속도, 선형 가속도/imu/mag: 지자기
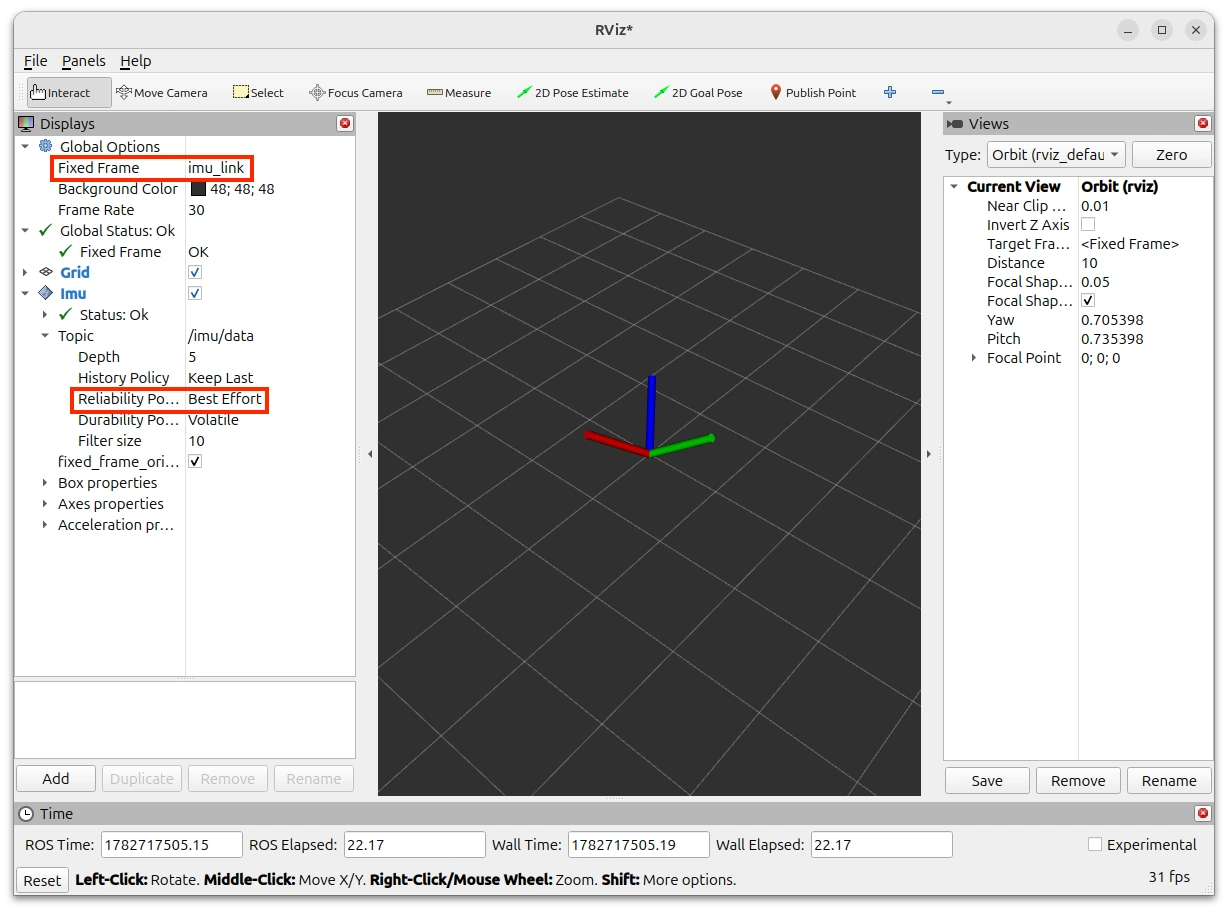
RViz에서 시각화
새 터미널에서 RViz를 실행합니다.
$ rviz2
Fixed Frame을base_link로 설정합니다.- 왼쪽 아래의 Add 버튼을 누릅니다.
- By display type에서 Imu를 추가합니다.
Topic을/imu/data로 설정합니다.- Imu의
Reliability Policy를 Best Effort로 설정합니다.